
Kettlebell Mobility Flow for Men Over 40: A 20-Minute Routine
Dumbbell Strength Standards for Men Benchmarks by Exercise

Skin Scents for Men What They Are and How to Wear Them
Kettlebell Mobility Flow for Men Over 40: A 20-Minute Routine
A stiff upper back can make an overhead press feel awkward. Tight hips can change the way you squat, hinge, and get up from the floor. If you are over 40, you may notice that a few hurried arm circles and toe touches no longer prepare you for a demanding workout. A kettlebell mobility flow offers another option: move through comfortable ranges while a light weight gives you feedback, balance, and just enough resistance to make the position useful.
This routine combines breathing, joint preparation, controlled strength, and deliberate transitions. It takes about 20 minutes, uses one kettlebell, and can serve as a standalone movement session or a warm-up before strength training. The aim is not to force a deeper stretch every week. It is to improve how confidently you can reach, rotate, hinge, squat, carry, and stand up. Work within a range you control, and treat smooth movement as the measure of progress.
What Is a Kettlebell Mobility Flow?
A kettlebell mobility flow links several movements into a repeatable sequence with minimal rushing between them. Instead of holding one stretch for a long time, you alternate positions that ask your hips, shoulders, spine, and ankles to move while the rest of your body stays organized. The bell may act as a counterbalance during a squat, a light load during a hinge, or a stable weight in a rack carry.
Mobility is more than passive flexibility. A person may be able to pull a knee toward the chest while lying down yet struggle to lift it during a step-up. A flow gives you practice controlling the available range while breathing normally. The load should help you find a position, not drag you into it. A simple kettlebell can make this practice more relevant to daily activities and weight training, particularly when you move slowly enough to notice where compensation starts.
Why a Kettlebell Mobility Flow can make sense after 40
Age alone does not make someone immobile. Training history, long hours sitting, old injuries, stress, and the amount of varied movement in a normal week often matter more. Yet many men in their 40s and beyond have accumulated a few predictable sticking points: reduced comfort rotating through the upper back, limited ankle motion in a squat, or difficulty separating hip movement from lower-back movement. Repeating a thoughtful flow several times per week gives those positions regular practice.
The benefits are practical. A controlled hinge can help you set up for deadlifts. A comfortable front-rack position can make carries and squats feel more stable. Floor transitions let you see whether you can lower yourself and rise without relying on momentum. These are training skills, not a promise to cure pain or reverse aging. Consistency, suitable loading, and recovery still matter.
Before You Begin: Choose the Right Kettlebell Mobility Flow and Range
Start lighter than you would for swings or heavy goblet squats. Many men can begin with roughly 8–12 kg, but there is no required starting weight. A 4–6 kg bell, an unloaded drill, or a household object held close to the chest may be the better choice if you are learning a movement. You should be able to pause at any point without shaking, gripping desperately, or holding your breath. If the weight pulls your shoulder forward or changes your balance, reduce it.
Set aside a clear floor space where you can take a step in each direction. Wear shoes that let you feel stable or train barefoot if the surface and your circumstances make that appropriate. Keep a chair or wall nearby for balance. You do not need to match a model range of motion: a shallow squat with good foot contact is more useful than a deep squat reached by rounding your back and lifting your heels.
Mild muscular effort is expected, but sharp pain, pinching, numbness, dizziness, or symptoms that worsen during a rep are signals to stop that movement. If you have a recent injury, joint replacement, significant balance problem, or a medical condition affecting exercise, get guidance from a qualified clinician before trying loaded positions. When in doubt, rehearse the pattern without weight first.
The rules that keep the Kettlebell Mobility Flow productive
Use a comfortable pace and breathe through each rep. Exhale during the demanding part, especially as you stand from a squat or return from a hinge. Keep the kettlebell close enough to control, and avoid treating mobility work like a speed challenge. Make the range smaller whenever your ribs flare, your lower back takes over, or your balance becomes uncertain. A well-executed partial rep counts.
For the first two weeks, leave two or three easy reps in reserve rather than pushing toward fatigue. The routine should prepare you to move better afterward. If you finish exhausted, use fewer rounds, a lighter bell, or longer rests. Improvements in coordination and tolerance usually come from repeated quality practice, not one aggressive session.
The 20-Minute Kettlebell Mobility Flow for Men Over 40
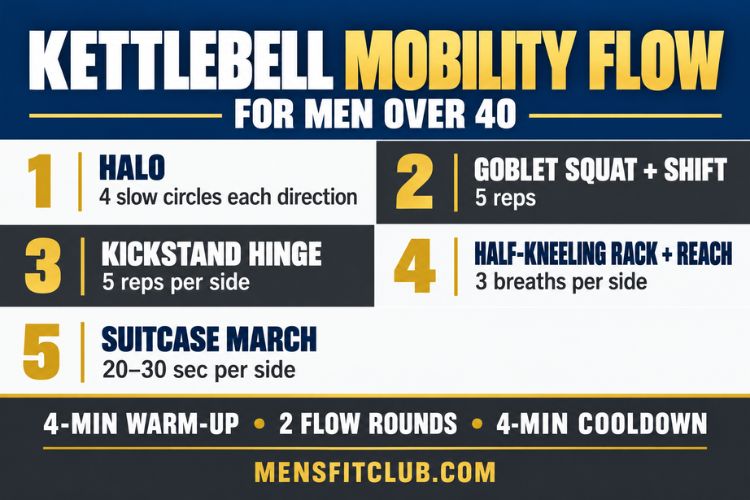
The session has three parts: four minutes of unweighted preparation, approximately twelve minutes of connected kettlebell movements, and four minutes of slower finishing work. The timings are guides; take extra time when you need to learn a transition. One round of the main flow includes the five moves below, performed in order. Complete two rounds, resting 30–60 seconds between exercises if necessary and about one minute between rounds. In a first session, one round is enough.
Minutes 0–4: Breathing and joint preparation
Begin standing with your feet about hip width apart. Take three slow breaths, allowing the ribs to expand around your sides and back. Exhale fully without tucking your pelvis forcefully. Then perform six easy bodyweight hip hinges: soften the knees, move your hips backward, and return to standing. Follow with five controlled ankle rocks per side, keeping the working heel on the floor as the knee travels forward. Finally, do five gentle upper-back rotations per side on all fours or seated in a chair. Turn your chest rather than yanking an elbow toward the ceiling.
This short preparation is especially helpful if you have been at a desk or in a car. The goal is to check how you feel today. If the ankle rocks are limited, you may need a shallower squat. If rotating the upper back feels uncomfortable, keep later reaches modest. Let this first four minutes inform the rest of the session instead of trying to override it.
Move 1: Kettlebell halo — 4 slow circles each direction Mobility Flow
Hold a light bell by the horns near your upper chest, with the bottom facing up if that grip is comfortable. Draw a small circle around your head, passing the bell beside one ear, behind your head, and back to the starting point. Keep your chin level and ribs stacked over your pelvis. The head stays relatively still while the shoulders and upper back contribute to the motion. Reverse direction after four circles.
Think of the halo as controlled shoulder exploration. Make the circle smaller if you need to arch the lower back or shrug hard to clear your head. You can also perform the movement with empty hands, one hand at a time, if a bell is too demanding. The reps should feel like a warm-up, not a shoulder endurance test.
Move 2: Goblet squat with a gentle bottom shift — 5 reps
Hold the kettlebell vertically at chest height with both hands around the horns. Set your feet at a stance that permits stable contact through the heel, big-toe base, and little-toe base. Inhale, bend the knees and hips, and descend only as far as you can keep your torso comfortably organized. Pause for one breath. Shift your weight a small amount toward one leg and then the other without letting either foot peel off the floor. Exhale as you stand.
The bell can counterbalance you, but it should not pull you into a depth you cannot own. If your heels lift or your lower back rounds significantly, elevate your heels slightly with a stable wedge, reduce the depth, or squat to a chair. If deep knee flexion bothers you, leave out the bottom shift and use a shorter pain-free squat. Count five deliberate reps, not five long battles to stay upright.
Move 3: Kickstand kettlebell hinge — 5 reps per side Mobility Flow
Hold the bell with both hands in front of your thighs. Put one foot slightly behind the other, with most of your weight on the front leg and the rear toes acting as a kickstand. Soften the front knee. Send your hips backward as the bell travels close to the front leg; stop when your torso begins to lose its neutral, comfortable position or you feel a moderate stretch in the back of the front thigh. Press through the front foot to stand tall.
Keep both hip bones facing forward rather than twisting open. The movement comes mainly from the hips, while the spine stays steady. Make the stance wider if balancing is difficult, or do an ordinary two-foot hinge. This variation lets each hip practice loading without demanding the balance of a single-leg deadlift. Five controlled reps on each side are plenty when the load is light and your attention stays on the pattern.
Move 4: Half-kneeling rack hold and reach — 3 breaths per side
Place a folded mat under one knee and step the other foot forward into a comfortable half-kneeling stance. Hold the kettlebell in the rack position on the same side as your back knee, with the forearm near vertical and the bell resting against the forearm and upper arm. Keep your ribs over your pelvis. With your free arm, reach gently forward and slightly upward as you exhale, then return it to your side. Repeat for three slow breaths before changing sides.
This is a stability drill with a small reach, not a maximum backbend. You may feel the front of the hip on the kneeling side working or lengthening as you stay tall. Avoid squeezing the glute so hard that you thrust the pelvis forward. If the rack position irritates your wrist or shoulder, set the bell down and do the kneeling reach unloaded, or hold the bell close to your chest with both hands. Use a chair beside you when getting down or standing up is the difficult part.
Move 5: Suitcase march — 20–30 seconds per side Kettlebell Mobility Flow
Stand tall with the kettlebell at one side as though carrying a suitcase. Walk slowly in place for 20–30 seconds, lifting each foot only as high as you can without leaning or hiking the opposite hip. Let the shoulders stay level and keep breathing. Switch hands and repeat. If marching challenges your balance, hold the bell and stand still, or walk slowly along a clear path with a wall nearby.
The carry asks you to resist side bending while your hips alternately support your weight. Avoid gripping the bell so tightly that the shoulders tense up around your ears. Choose a load that lets you finish with your posture intact. When the two sides feel different, spend the same time on both rather than adding extra work to the side that feels less coordinated.
Minutes 16–20: Slow down and finish
After your final round, place the bell on the floor. Perform three easy bodyweight squats to a chair or your comfortable depth, then three unweighted hinges. Notice whether the movements feel more controlled than they did at the start. Finish with a relaxed 60-second walk and several slow breaths. If one area feels especially stiff, repeat one light mobility drill from the warm-up for about 30 seconds per side. Avoid forcing an end-range stretch just because the session is almost over.
How to Link the Kettlebell Mobility Flow Exercises Without Rushing
The order moves from upper-body preparation to a squat, hinge, kneeling position, and carry. Set the kettlebell down between moves when a grip change is awkward. There is no prize for keeping it off the floor. In particular, move into and out of half-kneeling without trying to clean the bell or hold it while you lower yourself. Establish your base first, then bring the bell into position. When standing up, put the bell down if necessary and use your hands or a chair.
If you prefer a shorter session, perform the four-minute warm-up and one round of the flow. That takes roughly ten to twelve minutes, depending on transitions. If you have more time, use the extra minutes for another relaxed round or for a specific warm-up relevant to the workout ahead. Do not add weight simply to fill the clock. The flow works best when you can identify what each position is asking you to control.
How Often Should Men Over 40 Do This Kettlebell Mobility Flow?
Try the full routine two or three times per week for four weeks. You can use it before a full-body workout, on an easy recovery day, or after a long period of sitting. Before heavy lifting, keep the flow lighter and leave enough energy for your exercise-specific warm-up sets. A few halos, goblet squats, and hinges can prepare you generally, but they do not replace progressively heavier practice of the lift you are about to perform.
On a recovery day, one or two relaxed rounds are sufficient. A short walk before or after the flow can help you settle into an easy pace. If your training calendar already includes demanding kettlebell conditioning, place this mobility work where it helps rather than forcing it into every day. Soreness from the flow is a clue that you used too much load, volume, or range for its intended purpose.
A simple four-week progression
During week one, learn each movement unloaded or with a very light bell and complete one round. In week two, move to two rounds if every transition feels steady. In week three, lengthen one or two pauses by a comfortable breath or make the marches a little more deliberate. In week four, review your movement quality and add a modest amount of load only to an exercise that remains smooth. You need not increase every drill together. A better squat position or steadier carry is meaningful progress without a heavier kettlebell.
Keep a brief note after each session: bell weight, number of rounds, and one observation such as “heels stayed down” or “left rack felt easier.” This gives you a practical way to judge improvement without chasing arbitrary mobility scores. If a movement becomes less comfortable, shorten its range or return to the previous week’s version. Progression should make the flow more usable, not more elaborate.
Where This Flow Fits in a Strength Program
The routine pairs well with two or three weekly strength sessions that include a squat or step-up, a hinge, a push, a pull, and a carry. On a lifting day, use the warm-up and one round, then complete lighter sets of your first strength exercise before working weight. On a day without lifting, do the whole 20 minutes at a calm pace. This keeps the purpose clear: mobility practice supports training, while strength training gives you another chance to use the positions you rehearsed.
If your goal is better overhead motion, do not assume more halos alone will solve the problem. Check whether you can keep your ribs down during a light press and whether upper-back movement feels comfortable. If squats remain limited, notice your ankles, stance, and load selection. Use the flow to gather information, then tailor the rest of your program to the patterns that need the most attention. Gradual resistance training, adequate rest, and regular walking remain useful companions to a short mobility session.
Continue Your Training on MensFitClub
For another way to combine controlled movement with a kettlebell, explore The Kettlebell Mobility Workout. If the squat in this flow needs more practice, read the guide to Kettlebell Goblet Squats. When you are ready to turn these movement patterns into full sessions, try the 30 Minute Beginner Full Body Kettlebell Workout or the 3 Day Full Body Kettlebell Workout. You can also pair this mobility flow with a Full Body Workout For Men Over 40 to build a balanced weekly routine.
Build Mobility You Can Use
A kettlebell mobility flow for men over 40 should leave you moving with more awareness, not drained before the rest of your day. Start with a light bell, use the 20-minute sequence two or three times per week, and stay within positions you can control. The halo, goblet squat, kickstand hinge, kneeling reach, and suitcase march cover several movement demands in a compact session. Repeat the basics, note what changes, and let better control guide your next step in training.


Most Recommended

Subscribe to our Newsletter
Stay up to date on the latest men’s health, fitness and lifestyle trends and tips.
About Us
Men’s Fit Club was started with the goal of empowering men to get the most out of their lives. This meant going beyond exercise and diet tips to really address the broad range of issues that men face on a daily basis – topics like recreation, finding love, sexual health and even sound fashion advice.
Quick Links
© COPYRIGHT MEN'S FIT CLUB 2026. All Rights Reserved