
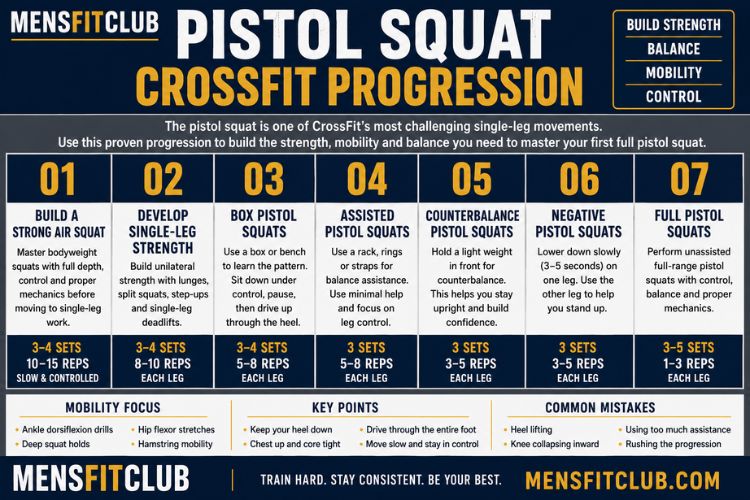
Pistol Squat CrossFit Progression From Beginner to Advanced
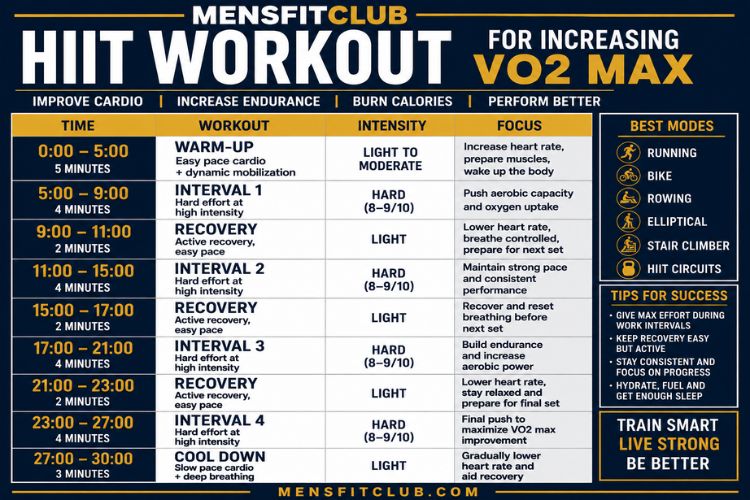
VO2 Max HIIT Workout: Improve Cardio and Endurance
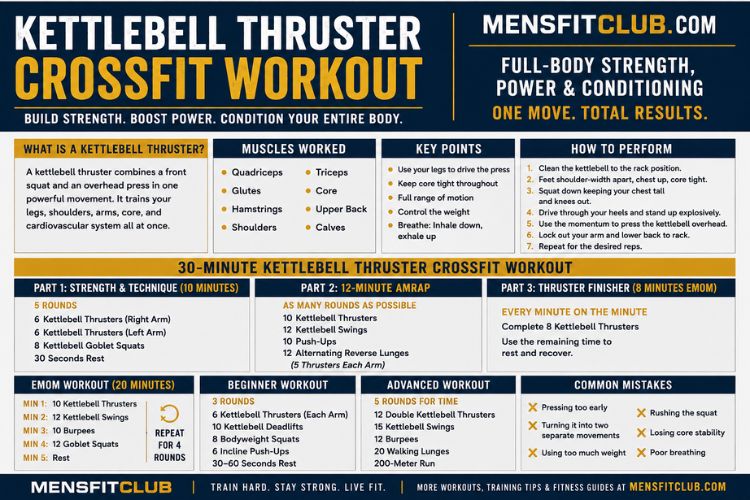
Kettlebell Thruster Workout for CrossFit Strength & Conditioning
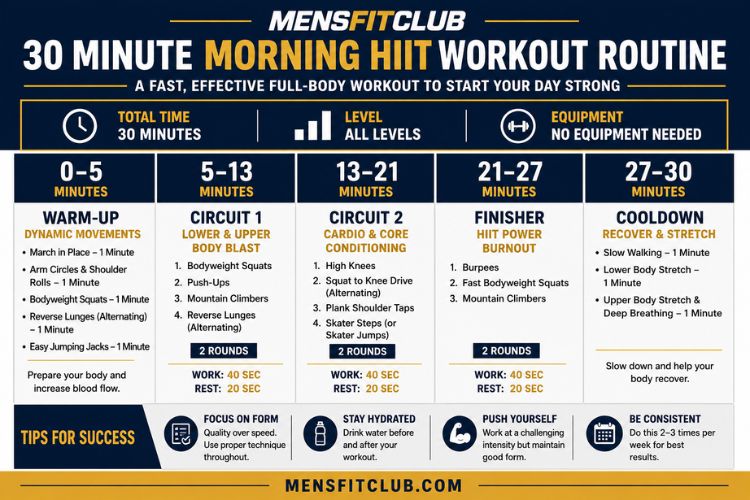
30 Minute Morning HIIT Routine to Start Your Day Strong
Pistol Squat CrossFit Progression From Beginner to Advanced
The pistol squat CrossFit progression is one of the most effective ways to develop the strength, mobility, balance, and body control required to perform one of CrossFit’s most challenging single-leg movements. A pistol squat looks relatively simple: stand on one leg, lower into a deep squat while keeping the opposite leg extended in front of you, and then stand back up. In practice, however, the movement demands considerably more than strong legs.
Successful pistol squats require ankle mobility, hip mobility, unilateral leg strength, core stability, coordination, and confidence in a deep single-leg position. Trying to perform full pistols before developing these qualities can lead to poor technique, loss of balance, or excessive compensation through the knee, hip, or lower back.
A structured CrossFit pistol squat progression solves this problem by breaking the exercise into manageable stages. Instead of repeatedly attempting a movement you cannot yet control, you gradually build the physical qualities needed to perform it correctly.
Whether your goal is to complete your first pistol squat, become more efficient during CrossFit WODs, or improve your ability to perform high-repetition pistols under fatigue, the following progression can help you build the movement from the ground up.
What Is a Pistol Squat in CrossFit?
A pistol squat is essentially a full-range-of-motion single-leg squat. The athlete begins standing on one leg while extending the non-working leg forward. From this position, the athlete lowers the hips toward the floor until reaching the bottom of the squat and then drives through the working leg to return to standing.
Unlike a traditional air squat, the pistol places almost the entire workload on one leg.
This significantly increases the strength and stability requirements.
Pistol squats frequently appear in CrossFit workouts because they challenge several physical abilities simultaneously. They can test strength, mobility, coordination, muscular endurance, and movement efficiency without requiring heavy equipment.
For advanced athletes, pistols can also be performed rapidly during high-repetition workouts, creating a significant conditioning challenge.
Muscles Worked During Pistol Squat in CrossFit
The pistol squat primarily targets the lower body, although the core and stabilizing muscles also work continuously throughout the movement.
The quadriceps produce much of the force required to stand from the bottom position. The glutes contribute to hip extension and help stabilize the pelvis. The hamstrings assist with controlling the descent and stabilizing the knee and hip.
Your calves and muscles surrounding the ankle work to maintain balance, while the core helps prevent excessive twisting, leaning, or collapsing.
Because the movement is unilateral, each leg must perform independently.
This is one reason pistol squat training can expose differences in strength, mobility, and coordination between your left and right sides.
Why Pistol Squat in CrossFit Are Difficult
Many athletes assume that being able to perform heavy back squats automatically means they should be capable of pistol squats.
That is not necessarily true.
A heavy bilateral squat demonstrates considerable lower-body strength, but the pistol requires additional qualities that traditional squatting may not fully develop.
Ankle Mobility
Ankle dorsiflexion is particularly important.
As you descend into a pistol squat, the knee needs to travel forward while the heel remains firmly planted. Limited ankle mobility can force the heel upward or cause the athlete to fall backward.
Improving ankle mobility is therefore one of the first priorities for athletes struggling to reach the bottom position.
Single-Leg Strength
Pistol squats require significantly more relative strength from each leg than regular air squats.
Your working leg must lower and raise nearly your entire bodyweight while maintaining control.
Developing unilateral strength through exercises such as split squats, lunges, step-ups, and assisted pistols can make the transition considerably easier.
Balance and Coordination Pistol Squat in CrossFit
Strength alone will not guarantee a successful pistol.
You must maintain your center of mass over a relatively small base of support—the working foot.
Even small changes in foot pressure, hip position, or torso angle can cause you to lose balance.
Hip Mobility
The hip must move through a large range of motion while the opposite leg remains extended.
Athletes with limited hip mobility may struggle to keep the non-working leg elevated or maintain proper positioning at the bottom.
Core Stability
Your torso naturally wants to rotate or collapse during a single-leg squat.
Strong abdominal and trunk muscles help maintain alignment throughout the movement.
Pistol Squat CrossFit Progression for Beginners
The most effective approach is to progress gradually rather than attempting full pistols every workout.
Master each stage before moving to the next.
Stage 1: Build a Strong Air Squat
Before training pistols, develop excellent control during regular bodyweight squats.
Stand with approximately shoulder-width foot placement and descend while keeping your heels planted. Your knees should track naturally in line with your feet while your torso remains controlled.
Practice:
3–4 sets of 10–15 controlled air squats
Use a slow descent of approximately three seconds.
Pause briefly at the bottom before standing.
You should be comfortable reaching a deep squat position without your heels lifting before progressing.
Stage 2: Develop Single-Leg Strength With Pistol Squat in CrossFit
Once your basic squat mechanics are solid, begin increasing unilateral leg strength.
Excellent exercises include reverse lunges, Bulgarian split squats, walking lunges, single-leg step-ups, and controlled step-downs.
A simple strength circuit could include:
Bulgarian split squats for 3 sets of 8–10 repetitions per leg.
Reverse lunges for 3 sets of 10 repetitions per leg.
Step-ups for 3 sets of 8 repetitions per leg.
Single-leg Romanian deadlifts for 3 sets of 8 repetitions per side.
Rest approximately 60–90 seconds between sets.
The objective is not speed. Focus on maintaining control and developing similar strength on both sides.
Stage 3: Box Pistol Squat in CrossFit
Box pistols are one of the best exercises for learning the movement.
Stand in front of a box or bench. Lift one foot from the floor and extend it forward.
Slowly lower yourself until your hips contact the box.
Pause briefly without completely relaxing.
Drive through your planted foot and return to standing.
Perform:
3–4 sets of 5–8 repetitions per leg
Initially, use a relatively high box.
As your strength improves, gradually lower the box.
This creates a simple and measurable pistol squat progression.
Stage 4: Assisted Pistol Squats
Assisted pistols allow you to practice the full movement while reducing balance and strength demands.
Hold a stable support such as a squat rack upright, gymnastics rings, suspension straps, or another secure object.
Extend one leg forward and slowly descend.
Use only enough assistance from your arms to maintain balance and complete the repetition.
Perform:
3 sets of 5–8 repetitions per side
Over time, gradually reduce how much assistance you use.
Avoid turning the movement into an upper-body pulling exercise.
Your working leg should still perform most of the work.
Stage 5: Counterbalance Pistol Squat
Interestingly, some athletes find pistol squats easier while holding a light weight.
Holding a small plate, dumbbell, or kettlebell in front of your body can provide a counterbalance that makes it easier to keep your center of mass over your working foot.
Hold the weight with your arms extended forward.
Lift one leg.
Descend slowly into the pistol.
Drive through the entire foot to return to standing.
Start with:
3 sets of 3–5 repetitions per leg
As your technique improves, gradually decrease the amount of counterbalance.
Eventually, transition to bodyweight pistols.
Stage 6: Negative Pistol Squats
Eccentric or negative pistol squats are excellent for building the strength required to stand from the bottom.
Begin standing on one leg.
Take approximately three to five seconds to lower yourself toward the bottom.
Once you reach the bottom, place your opposite foot on the floor and stand using both legs if necessary.
Perform:
3 sets of 3–5 slow repetitions per leg
The goal is complete control during the descent.
If you fall during the final portion of every repetition, shorten your range temporarily and gradually increase depth.
Stage 7: Full Pistol Squat
Once you can perform deep assisted pistols and controlled negatives, begin practicing unassisted repetitions.
Stand tall with your working foot firmly planted.
Extend your arms and opposite leg forward.
Slowly bend the working knee while allowing the hips to descend.
Maintain pressure through your entire foot.
Reach the bottom position under control.
Drive through your foot and extend your knee and hip until you return to standing.
Start with low volume.
Perform approximately:
3–5 sets of 1–3 repetitions per leg
Quality is more important than quantity.
Once your technique becomes consistent, gradually increase repetitions.
Pistol Squat Mobility Routine
Mobility training can dramatically improve your pistol squat progression, especially if ankle or hip restrictions are limiting your depth.
Before training pistols, spend approximately five to ten minutes preparing the relevant joints.
Ankle Dorsiflexion Drill
Place one foot several inches from a wall.
Keeping your heel planted, drive your knee toward the wall.
Return and repeat.
Perform 10–15 controlled repetitions per ankle.
Gradually increase the distance between your toes and the wall while maintaining heel contact.
Deep Squat Hold
Assume a comfortable deep squat with both feet planted.
Hold the position for approximately 20–40 seconds.
Focus on keeping your chest controlled and heels firmly on the floor.
Perform two or three rounds.
Hip Flexor Stretch
Tight hip flexors can interfere with lower-body mechanics.
Use a half-kneeling hip flexor stretch for approximately 30 seconds per side.
Avoid aggressively arching your lower back.
Hamstring Mobility
The extended leg position during a pistol requires sufficient hamstring flexibility.
Dynamic leg raises or controlled hamstring stretches can help prepare the movement.
CrossFit Pistol Squat Strength Workout
Training pistols two or three times per week is sufficient for most athletes.
A simple strength session could look like this:
Warm-Up
5 minutes of light rowing, cycling, or jogging.
Then perform two rounds of:
10 air squats
8 reverse lunges per leg
10 ankle mobility repetitions per side
20-second deep squat hold
Strength Work
Bulgarian split squat: 4 sets of 8 per leg.
Box pistol squat: 4 sets of 5 per leg.
Single-leg Romanian deadlift: 3 sets of 8 per leg.
Assisted pistol squat: 3 sets of 5 per leg.
Finish with controlled core training such as planks, dead bugs, or hollow-body holds.
4-Week Pistol Squat CrossFit Progression
A short training cycle can help you systematically improve the movement.
Week 1: Mobility and Control
Focus on ankle mobility, air squats, split squats, and high box pistols.
Train the progression two or three times during the week.
Keep every repetition slow and controlled.
Week 2: Increase Range of Motion
Reduce the box height slightly.
Add assisted full-range pistol squats.
Continue unilateral strength exercises.
Aim for approximately 15–25 quality pistol progression repetitions per leg across each session.
Week 3: Build Eccentric Strength
Introduce negative pistol squats.
Use three-to-five-second descents.
Continue assisted pistols but reduce your reliance on your arms.
Attempt occasional unassisted repetitions if your movement feels controlled.
Week 4: Practice Full Pistols
Begin each pistol session with several fresh attempts at full repetitions.
Avoid attempting them after exhausting your legs.
Perform approximately 3–5 sets of 1–3 controlled pistols per leg.
Afterward, use assisted or box variations for additional training volume.
How to Improve Pistol Squat Balance
Balance improves through repeated exposure to single-leg positions.
Spend time simply standing on one leg.
Progress by performing slow knee raises, single-leg Romanian deadlifts, step-downs, and controlled single-leg squats.
Pay attention to your foot.
Instead of placing all your weight on your heel, maintain contact through the heel, base of the big toe, and base of the little toe.
This creates a stable platform sometimes described as the tripod foot.
Better foot control can dramatically improve pistol squat stability.
Common Pistol Squat Mistakes
Several mistakes frequently slow progress.
Heel Lifting From the Floor
A lifting heel often indicates limited ankle mobility or poor balance.
Continue ankle mobility work and consider using box or assisted pistols while improving your range.
Knee Collapsing Inward
Allowing the knee to collapse excessively inward may reduce stability and control.
Focus on keeping your knee tracking approximately in line with your foot.
Strengthening your glutes and practicing controlled split squats can also help.
Falling Into the Bottom
Dropping rapidly into the bottom position removes muscular control.
Slow down.
Use negative pistols and box pistols to develop eccentric strength.
Using Too Much Assistance
During ring or rack-assisted pistols, athletes sometimes pull themselves upward primarily with their arms.
Use the smallest amount of assistance necessary.
Your working leg should remain the primary driver.
Progressing Too Quickly
Attempting dozens of full pistols before developing adequate strength and mobility usually reinforces poor technique.
Progress gradually and prioritize movement quality.
How to Scale Pistol Squats in CrossFit WODs
You do not need full pistols to participate in a workout containing pistol squats.
CrossFit workouts can be scaled according to your current ability.
Common alternatives include box pistols, assisted pistols, alternating lunges, step-ups, or controlled single-leg squats to a target.
Choose a variation that allows you to maintain consistent movement quality throughout the workout.
For example, if the prescribed workout contains 30 alternating pistols but you can only perform two controlled pistols, using assisted or box pistols may provide a better training stimulus.
Scaling is part of effective progression.
How Often Should You Practice Pistol Squats?
For most athletes, two to three focused sessions per week works well.
Avoid performing maximum-effort pistol attempts every day.
Your muscles, tendons, and joints need time to adapt.
A productive weekly structure could include one strength-focused session, one technique-focused session, and one CrossFit workout containing a scaled pistol variation.
Keep dedicated practice relatively short.
Ten to twenty minutes of focused pistol work can produce better results than repeatedly attempting poor-quality repetitions for an hour.
When Should You Add Weighted Pistol Squats?
Weighted pistol squats should generally come after you have developed consistent bodyweight technique.
You should be able to perform multiple controlled repetitions on both legs without relying on momentum.
Begin with a light kettlebell, dumbbell, or weight plate.
Adding resistance changes the strength demands considerably, so progress conservatively.
Weighted pistols can eventually become an excellent unilateral strength exercise for experienced CrossFit athletes.
Pistol Squat CrossFit Progression for WOD Performance
Learning one perfect pistol is different from performing dozens during a CrossFit workout.
Once you can consistently perform full pistols, gradually build repetition capacity.
Start with small alternating sets.
For example:
2 pistols per leg.
Then 3 per leg.
Then 5 per leg.
Eventually practice sets of 10 or more alternating repetitions while maintaining control.
Avoid rushing this process.
Your ability to perform pistols while fresh may develop considerably faster than your ability to maintain technique while fatigued.
Final Thoughts on the Pistol Squat CrossFit Progression
The pistol squat CrossFit progression should be treated as a combination of strength training, mobility work, balance practice, and technical skill development. Very few athletes improve their pistols simply by attempting full repetitions over and over again.
Start by building excellent squat mechanics and improving ankle and hip mobility. Develop unilateral strength through split squats, lunges, step-ups, and single-leg exercises. Progress into box pistols and assisted pistols before introducing controlled negatives and eventually full repetitions.
Once you can perform bodyweight pistols consistently, gradually increase your repetition capacity so you can maintain efficient technique during CrossFit workouts.
There is no need to rush the progression. Some athletes develop their first pistol relatively quickly, while others require additional time to improve mobility or single-leg strength.
Focus on consistent, high-quality practice.
With progressive training, stronger legs, improved mobility, and better balance, the pistol squat can move from being an intimidating CrossFit skill to a dependable movement you can confidently use during training and WODs.
For additional lower-body training, start with the MensFitClub guide to Pistol Squat Benefits Power Balance And Mobility, which complements this progression with more information about the exercise itself. Athletes still developing their squat foundation can use the Bodyweight Squat Workout Guide before progressing to demanding single-leg variations. For more structured leg development, add exercises from the Squat Workout Plan For Strength And Power. You can also incorporate pistol squat practice into a broader CrossFit Workout Plan to combine skill work with strength and conditioning. Finally, the 30-Day Bodyweight Squat Challenge provides another progressive option for developing lower-body strength and muscular endurance.


Most Recommended

Subscribe to our Newsletter
Stay up to date on the latest men’s health, fitness and lifestyle trends and tips.
About Us
Men’s Fit Club was started with the goal of empowering men to get the most out of their lives. This meant going beyond exercise and diet tips to really address the broad range of issues that men face on a daily basis – topics like recreation, finding love, sexual health and even sound fashion advice.
Quick Links
© COPYRIGHT MEN'S FIT CLUB 2026. All Rights Reserved