
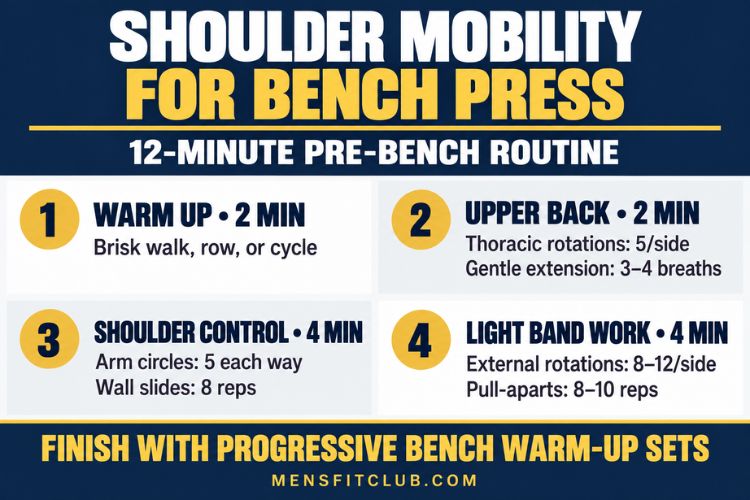
Shoulder Mobility Workout for Bench Press: A Practical Warm-Up
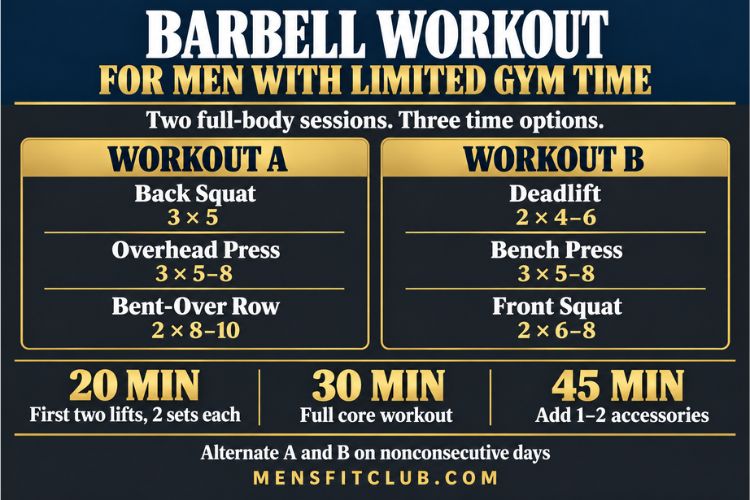
Barbell Workout for Men With Limited Gym Time | MensFitClub

How Men Can Layer Cologne Deodorant and Body Wash
Rest Day Mobility Routine for Muscle Recovery Gentle 25-Min Plan
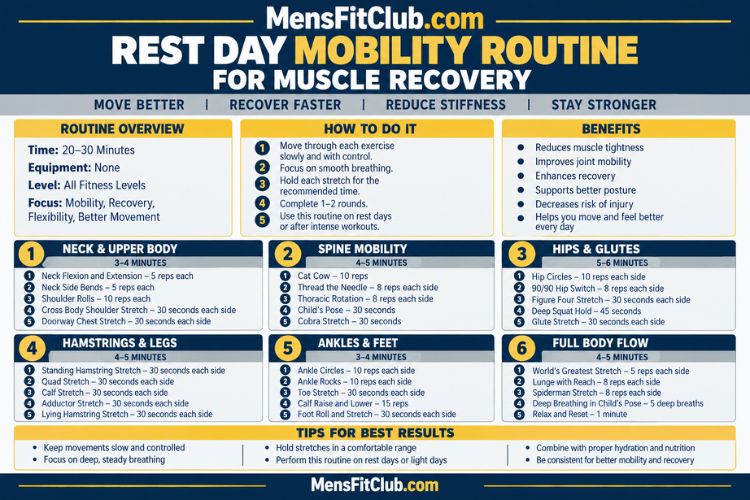
Hard training is only one part of getting stronger. The work you do between challenging sessions matters, too. A rest day mobility routine gives you a chance to move stiff joints, practice comfortable ranges of motion, and notice how your body feels before your next workout. You do not need to break a sweat or chase a new flexibility record. The aim is to finish feeling better prepared for normal activity, with plenty of energy left for the training that matters.
This 25-minute full-body plan suits men who lift weights, run, cycle, play sports, or spend long hours at a desk. It needs only some floor space and, optionally, a chair or wall for support. You will move through an easy warm-up, ankles and hips, the upper back and shoulders, and a short cooldown. Each exercise includes a simpler option. If you are unusually tired, the 10-minute version later in the article is enough.
What Is a Rest Day Mobility Routine?
Mobility is the ability to move a joint through a useful range with control. A hip circle, for example, asks you to guide your hip through a comfortable arc instead of simply holding a position. Flexibility describes how far tissues can lengthen; a static calf stretch is one way to explore it. Both can have a place in a recovery day, but neither needs to be forced. For this routine, think slow, easy movement first, followed by brief, comfortable holds where they feel helpful.
An active recovery day is a break from your usual hard exercise while allowing light activity such as walking or gentle mobility. A complete day off is also a valid choice. The American College of Sports Medicine describes easy walking, stretching, and balance work as rest-day options, while UCLA Health emphasizes finishing a recovery day feeling refreshed. Use that standard to judge whether the session suits you.
Will Mobility Work Speed Up Muscle Recovery?
Mobility may make everyday movement feel less stiff and give you a useful chance to check how your joints respond. It does not directly rebuild muscle, and stretching is not a reliable cure for delayed-onset muscle soreness. A systematic review found too little consistent evidence to support post-exercise stretching as a way to restore strength or reduce soreness compared with passive rest. Treat this session as low-stress movement and skill practice, not a shortcut that lets you ignore sleep, food, or a sensible training schedule.
How Hard Should Rest Day Mobility Routine Feel?
Keep the effort around 2 or 3 out of 10. Breathe normally, speak in full sentences, and move within a range you can control without bracing or grimacing. Gentle tension is fine; sharp pain, pinching, numbness, or a joint that feels unstable is a reason to stop that movement. If you feel progressively worse during the routine, shorten it or rest instead. Avoid turning each drill into a test of how far you can go.
Soreness after a new or hard workout may appear a day or two later. When muscles feel tender, start with smaller ranges and fewer repetitions. If there is severe pain, swelling, marked weakness, dark urine, or pain that seems different from ordinary training soreness, seek medical advice rather than trying to stretch through it. Cleveland Clinic notes that rest is often the best treatment for delayed-onset muscle soreness.
When Should You Do the Routine?
Use it the day after a demanding workout, on a scheduled day away from lifting, or during a lighter training week. Morning, midday, and evening all work; choose the time you can repeat. You can pair it with a leisurely walk, but neither part has to be long. If your next hard session is tomorrow, stop well before your muscles feel fatigued. If a particular area is especially sore, spend less time there and choose movements that feel comfortable.
The 25-Minute Rest Day Mobility Routine
Set a timer if it helps, but do not race through the movements. The time blocks add up to 25 minutes: three minutes to ease in, seven for ankles and hips, seven for the spine and shoulders, five for full-body movement, and three to wind down. Move slowly enough to notice where motion comes from. Rest briefly whenever you need to change position or catch your breath.
Minutes 0–3: Easy Walk and Breathing
Walk around the room or outside for two minutes at a relaxed pace. Let your arms swing naturally and keep your steps easy. Then stand or sit for one minute of quiet breathing. Inhale comfortably through your nose if possible, and exhale without forcing air out. Let your shoulders settle rather than holding a rigid posture. This beginning helps you shift from sitting to movement and gives you a baseline: notice whether the body feels tired, sore, or ready for a little more range.
If walking does not suit you today, march gently beside a chair or perform easy seated ankle pumps and arm circles. You are only warming up for a light session. There is no target heart rate, step count, or breathing pattern to achieve.
Minutes 3–5: Ankle Rocks Rest Day Mobility Routine
Face a wall and place your hands against it. Step one foot forward, bend that knee toward the wall, and keep the heel in contact with the floor. Move the knee forward and back eight to ten times, then switch sides. Allow the knee to track roughly in the direction of the toes. Keep the motion smooth and stop before the heel lifts or the front of the ankle pinches. Use about one minute per side.
This drill lets you explore ankle motion used during walking, stairs, and squats. Stand closer to the wall for a smaller range. If kneeling feels comfortable, you can do the same movement in a half-kneeling position, but the standing version is equally useful on a rest day.
Minutes 5–7: Supported Hip Circles
Hold a chair or wall with one hand. Shift your weight onto one leg and lift the other knee only as high as feels easy. Draw a slow circle with the raised knee: forward, outward, and back to the start. Perform five circles in each direction and change legs. Keep your torso mostly quiet, your standing knee soft, and the circles small enough that you do not have to twist your lower back.
If balancing is difficult, keep the moving toes on the floor and trace small circles with your foot. You can also sit in a sturdy chair and lift one knee at a time. This is a controlled hip movement, not a challenge to reach the largest circle possible.
Minutes 7–10: Half-Kneeling Hip Flexor Shift Rest Day Mobility Routine
Place one knee on a folded towel with the opposite foot in front, or use a split stance while standing. Gently tuck your pelvis as though bringing the belt buckle slightly upward. Shift your body forward until you notice a mild sensation at the front of the rear hip. Hold for about 15 to 20 seconds, ease out, and repeat twice before changing sides. Spend roughly 90 seconds per side, including the transitions.
Keep your ribs over your pelvis. Leaning far forward or arching your back can hide the movement you are trying to feel. If the kneeling position bothers your knee, use the standing split stance and hold the wall for balance. If the front of the hip pinches, reduce the shift or skip the drill.
Minutes 10–12: Cat-Cow and Comfortable Spinal Motion
Come onto hands and knees, placing a towel under your knees if needed. On an easy exhale, round your back a little and let your head follow. On an inhale, reverse the motion gently without dropping into an extreme arch. Repeat six to eight slow cycles. The goal is to move several parts of the spine, not to force one section as far as it will go.
For a wrist-friendly version, place your forearms on a bench or do the movement seated, hands on thighs. After the last repetition, pause in a neutral position and notice whether your back feels more comfortable. If it does not, make the next movement smaller rather than adding more repetitions.
Minutes 12–15: Open-Book Upper-Back Rotations Rest Day Mobility Routine
Lie on your side with hips and knees bent, arms reaching forward, and your head supported on a pillow if needed. Slowly sweep the top arm across your body and open your chest toward the ceiling. Follow your hand with your eyes only if your neck feels comfortable. Return with control. Perform five to six repetitions per side, taking about 90 seconds each.
Keep the knees together or rest the top knee on a pillow so the motion comes mainly from the upper back. There is no need to make the moving hand touch the floor. If lying on the floor is inconvenient, sit sideways on a chair, cross your arms loosely over your chest, and rotate your rib cage a few degrees in each direction.
Minutes 15–17: Wall Slides
Stand with your back near a wall, knees soft, and forearms or hands resting lightly against the wall. Slide your arms upward only as far as you can without shrugging hard, arching your lower back, or feeling a shoulder pinch. Lower slowly. Complete eight to ten repetitions over two minutes. Keep your breathing easy and let the shoulder blades move naturally.
You do not have to keep every part of the arm glued to the wall. Step a little farther away or face the wall if that makes the motion smoother. If overhead movement is uncomfortable, replace the slides with small shoulder circles or gentle forward reaches at chest height.
Minutes 17–20: Bodyweight Squat to Comfortable Reach Rest Day Mobility Routine
Stand with feet at a comfortable width and a chair behind you. Lower toward the chair as though sitting down, stopping at a depth you can control. Stand, then reach both arms forward or slightly overhead if your shoulders permit. Perform six to eight slow repetitions, resting between them as needed. Spend about three minutes here, including setup and an easy pause halfway through.
This links the ankle, hip, upper-back, and shoulder motion you practiced earlier. You should feel coordinated rather than challenged. Hold the chair for support, use a shallower squat, or simply sit down and stand up. If your legs are sore from heavy squats or running, replace this block with three minutes of relaxed walking.
Minutes 20–22: Gentle Side-to-Side Weight Shifts
Stand with feet wider than hip width and hold a counter or chair if needed. Shift your weight toward one foot while bending that knee slightly, then move through the middle to the other side. Do six slow shifts per side. Keep both feet grounded and your torso comfortably upright. A mild sensation along the inner thigh is enough; there is no reason to sink into a deep lateral lunge.
This drill gives the hips a different direction of movement from walking and squatting. Reduce your stance width if the groin feels sensitive. If standing is not practical, sit tall and move one knee gently outward and back, one side at a time, without pressing it with your hand.
Minutes 22–25: Easy Walk and Optional Calf Stretch
Walk at an unhurried pace for two minutes. Let your arms move freely and notice whether your steps feel easier than at the beginning. If a calf stretch feels pleasant, spend the final minute with one foot behind the other, back heel down, holding a mild stretch for about 20 to 30 seconds on each side. Keep it light; you should be able to breathe normally.
You can spend that last minute sitting quietly instead. The purpose of the cooldown is to finish calmly and check your response. A successful rest day session leaves you with energy to spare.
A 10-Minute Mobility Routine for Busy Rest Days
When time or energy is limited, use a condensed version: two minutes of easy walking, one minute of ankle rocks, one minute of supported hip circles, two minutes of standing hip flexor shifts, two minutes of seated or floor-based upper-back rotations, and two minutes of relaxed walking. Perform fewer repetitions if you need more time to change positions. This is also a useful choice after travel or on a day when your legs feel heavy.
Do not try to squeeze every exercise from the longer session into ten frantic minutes. Pick the movements that address how you feel today. A short routine that you can repeat comfortably is more useful than an ambitious session that leaves you sore or reluctant to move tomorrow.
How to Adapt the Rest Day Mobility Routine After Different Workouts
After a Heavy Leg Day
Keep the warm-up and ankle rocks, but make the squat and side-shift blocks very small or replace them with walking. Gentle hip circles and a light standing hip flexor shift may feel good, yet neither needs a deep range. If getting onto the floor feels like a workout, do the chair-based versions. Your next leg session will benefit more from arriving rested than from forcing tired muscles through long stretches.
After Upper-Body Lifting
Spend a little more time with open-book rotations, wall slides, and easy breathing. Keep your elbows and shoulders within pain-free ranges, especially after pressing or pull-ups. If your arms are very sore, hold them lower during the open-book exercise and perform small shoulder circles instead of reaching overhead. Use the remaining minutes for a walk rather than adding more upper-body volume.
After Running or Conditioning
Start especially gently if your calves, feet, or hips are tender. Ankle rocks, small hip circles, and a comfortable walk are often enough. Skip deep lunges and aggressive calf stretching when the tissues feel irritated. You can reduce the full routine to ten minutes if you are carrying fatigue from a long run, intervals, or a demanding sport session.
Common Rest Day Mobility Routine Mistakes
The first mistake is pushing every movement to its end range. More range is not automatically better, especially when a joint feels sensitive. Use a range you can enter and leave smoothly. The second is adding demanding holds, long circuits, or loaded exercises until the recovery session becomes another workout. Save those challenges for training days.
Another mistake is treating soreness as a sign that you must stretch harder. Ordinary delayed-onset soreness often resolves with time, and forcing tender tissue may make the session unpleasant. Keep a simple check-in: how do you feel before, during, and several hours after? If the answer worsens, scale back next time. Finally, do not assume everyone needs the same movements. A chair-supported version is a sound choice, and skipping one painful drill does not invalidate the routine.
How Mobility Routine Fits Into a Rest Day Muscle Recovery Plan
A gentle routine is one small part of a larger recovery pattern. Plan hard sessions so the same muscles are not repeatedly pushed beyond their current capacity. Eat enough to support your training, include protein across your meals, drink according to your needs, and give sleep a regular place in your schedule. A mobility session cannot compensate for consistently poor sleep or training loads you cannot recover from.
Track whether your normal workout performance, motivation, and general energy are returning. If you repeatedly need to turn a rest day into a rescue mission, examine the amount and intensity of training, especially after a sudden increase. On some days, complete rest will be the better option. On others, a walk and a few easy joint movements will feel welcome. Both choices support a sustainable routine.
Explore More Rest Day Mobility Routine on MensFitClub
For more ways to make recovery fit your training, explore our Best Mobility Exercises for extra hip, spine, and ankle movements, then read the Active Recovery Workouts Guide for gentle activity options beyond this routine. If fatigue keeps building, review the Signs You May Be Working Out Too Much. You can also place this session into a Beginner 7 Day Workout Plan or a broader Weekly Workout Routine For Men with planned recovery days.
Make Recovery Days Easier to Repeat
The best rest day mobility routine is one that fits your training and leaves you feeling capable. Begin with easy movement, guide the ankles and hips through comfortable ranges, add a little upper-back and shoulder motion, and stop before effort accumulates. Use the 25-minute plan when you want a full reset and the 10-minute option when a lighter touch makes more sense. Notice your response, adjust the next session, and let recovery remain recovery.


Most Recommended

Subscribe to our Newsletter
Stay up to date on the latest men’s health, fitness and lifestyle trends and tips.
About Us
Men’s Fit Club was started with the goal of empowering men to get the most out of their lives. This meant going beyond exercise and diet tips to really address the broad range of issues that men face on a daily basis – topics like recreation, finding love, sexual health and even sound fashion advice.
Quick Links
© COPYRIGHT MEN'S FIT CLUB 2026. All Rights Reserved