

Rucking Workout for Men Over 50: Beginner Plan

Progressive Overload Calisthenics Without Weights

Upper Body Barbell Giant Set Workout for Muscle Growth
6-Week Rucking and Strength Program for Men
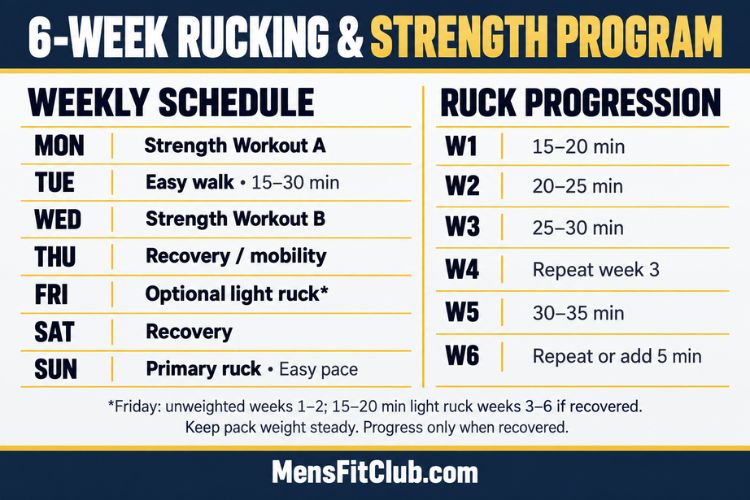
A 6-week rucking and strength workout program combines two practical forms of exercise: walking with a weighted backpack and lifting weights. Together, they create a straightforward training routine for men who want to improve conditioning, develop full-body strength, and become more comfortable with physically demanding everyday activities.
Rucking gives your walks a new challenge without requiring complicated workouts. Strength training provides the progressive resistance needed to develop muscles that support lifting, carrying, climbing, and moving under load. However, combining these activities successfully requires more planning than adding a heavy backpack to every walk.
This program uses two full-body strength workouts, one primary rucking session, and an optional second light ruck each week. The emphasis is on manageable effort, consistent technique, and gradual improvement. You will build walking duration before considering additional pack weight, while progressing your strength exercises according to performance.
The following schedule is an original general fitness template for healthy adults who can already walk comfortably for approximately 30 minutes. It is designed for recreational training rather than military selection, heavy load carriage, or competitive endurance events.
What Is Rucking Strength Workout Program?
Rucking means walking while carrying weight in a backpack or purpose-built rucksack. The pack creates an additional physical demand, making a familiar activity more challenging.
A recreational ruck might involve a short walk around your neighborhood with a lightly loaded backpack. More advanced sessions can involve longer distances and varied terrain. For beginners, the simplest starting point is a flat route, a comfortable walking pace, and a modest load.
How Rucking Differs From Regular Walking
During a normal walk, you move your body weight. During a ruck, you also carry an external load. That load changes the demands of the activity and may affect your posture, stride, and perceived effort.
The goal is to preserve a comfortable walking pattern. If you need to hunch forward, shorten every step dramatically, or repeatedly adjust uncomfortable straps, the setup needs attention.
A useful beginner session should feel like purposeful walking. You should finish with enough energy to continue your day rather than feeling as though you have completed an exhausting endurance test.
Why Combine Rucking Workout With Strength Training Program?
Rucking provides practice moving under load, while resistance training develops strength through movements such as squats, hinges, presses, and rows. These activities complement each other when the total workload remains manageable.
The Human Performance Resources by CHAMP identifies strength, trunk training, and cardiovascular conditioning as useful components of load-carriage preparation. It also warns that frequent rucking and rapid load increases can contribute to overuse injuries. Its guidance concerns military load carriage, so this recreational plan uses substantially lighter loads and shorter sessions.
Strength workouts also allow you to train upper-body muscles through ranges of motion that walking with a backpack does not provide. Rucking should therefore support your lifting routine rather than replace it.
Who Should Follow This 6-Week Rucking Strength Workout Program?
This plan suits men who have basic walking fitness and want a structured introduction to rucking alongside full-body strength training. It can also work for recreational lifters who want an outdoor conditioning option.
You do not need previous rucking experience. However, you should be able to walk on level ground comfortably before adding weight.
If a 30-minute unweighted walk is currently difficult, begin with shorter regular walks and basic resistance exercises. Building that foundation first makes the loaded sessions easier to assess and adjust.
Adjusting the Plan for Men Over 40 or 50
Age alone does not determine your starting load or training capacity. Recent activity, strength experience, balance, recovery, and existing symptoms are more useful starting points.
Men returning after a long break should use the lower end of the suggested durations and begin with one weekly ruck. The optional second session can remain an unweighted walk throughout all six weeks.
If you have a condition that affects exercise tolerance, balance, bone health, or your ability to carry weight, discuss loaded walking with your healthcare professional before beginning.
Equipment for Rucking and Strength Workouts Program
You need a secure backpack, suitable walking shoes, and access to basic resistance equipment. A pair of dumbbells is enough for most exercises in this program.
Choosing and Loading Your Backpack
Use a backpack with comfortable straps and a load that stays in place. A purpose-built rucksack can help, but a sturdy everyday backpack may work for light introductory sessions.
Place the weight close to your back and prevent it from bouncing. Wrap hard objects securely, keep edges away from your body, and check that the pack can safely carry the intended load.
For the flat, stable routes used here, keeping the load close to your body helps the pack feel more controlled. HPRC emphasizes that load placement and pack fit influence posture and comfort during loaded walking.
Count everything in the pack when recording weight, including water and the backpack itself.
Selecting Shoes and Clothing
Choose shoes you already find comfortable for walking. Avoid combining your first loaded session with unfamiliar footwear.
Wear socks that stay in position and clothing that does not rub under the straps. Inspect your feet after early sessions so you can address developing hot spots before they become blisters.
Carry water when conditions or session length warrant it. In warm weather, choose cooler hours and reduce the session if the same pace feels unusually demanding.
How Much Weight Should You Carry? Rucking Strength Workout Program
For this introductory plan, approximately 5–10 pounds of total pack weight is a practical starting option for many adults. This is a programming suggestion, not a universal safe threshold.
Smaller individuals, people returning from inactivity, and anyone uncertain about carrying weight can begin lighter. An almost empty backpack is a valid first step.
Use Comfort and Walking Quality to Guide the Load
Your starting weight should allow upright, relaxed walking with natural arm movement and a comfortable stride. You should be able to speak in complete sentences.
If the load causes back discomfort, shoulder pressure, numbness, or an altered gait, stop and adjust it. Do not assume discomfort will disappear simply because you keep walking.
You can complete the entire six-week program with the same pack weight. Improving duration, comfort, and consistency is meaningful progress without heavier loading.
Progress One Variable at a Time: Rucking Strength Workout Program
Rucking difficulty changes with duration, pack weight, pace, terrain, and weather. Increase only one planned variable at a time.
This program primarily develops walking duration. It does not require weekly increases in backpack weight or prescribe aggressive pace targets.
If you choose to increase load later, return to a shorter familiar session first. That makes it easier to assess the effect of the added weight.
Weekly Schedule for the Rucking and Strength Program
The default schedule places Strength Workout A on Monday, an easy unweighted walk on Tuesday, and Strength Workout B on Wednesday. Thursday is a recovery day. Friday offers an optional short, light ruck, Saturday is another recovery day, and Sunday contains the primary ruck.
Keep Tuesday’s walk comfortable, generally around 15–30 minutes. Recovery days can include gentle movement, but they should not become additional hard training sessions.
When to Use the Optional Friday Ruck
During the first two weeks, make Friday an unweighted walk. From week three onward, a short light ruck is optional if your feet, joints, and overall energy feel normal.
Use the same or a lighter pack than Sunday’s session. Keep Friday at approximately 15–20 minutes, and avoid turning it into another progression workout.
If Sunday’s ruck consistently leaves you sore or fatigued on Monday, move the next strength workout back a day. The schedule should accommodate recovery rather than force training through lingering symptoms.
Warm Up Before Each Rucking Strength Workout Program
Before lifting, spend approximately five to eight minutes moving easily. Follow with controlled bodyweight squats, unloaded hip hinges, arm movements, and a few light practice sets.
Use the warm-up to assess how you feel. If familiar movements are uncomfortable or unusually difficult, reduce that day’s workout.
Before rucking, walk unweighted for a few minutes and check your footwear and pack. Begin the loaded portion slowly, then settle into your normal walking rhythm.
Set the Right Training Effort
Most strength sets should finish with approximately two or three repetitions in reserve. This means you could perform another two or three technically sound repetitions if necessary.
For rucking, use an effort of roughly three to five out of ten. Breathing should become more noticeable while conversation remains possible.
These targets keep the sessions productive without requiring exhaustion. If you cannot maintain them, reduce weight, repetitions, duration, or pace.
Strength Workout A: Squat, Push, and Pull
Workout A develops full-body strength with a squat, an upper-body press, a row, a hip exercise, and trunk training.
During weeks one and two, perform two working sets per exercise. From week three onward, selected exercises progress to three sets if recovery remains good.
Goblet Squat: 8–12 Repetitions Rucking Strength Workout Program
Hold a dumbbell close to your chest and squat through a comfortable range. Keep your feet stable and allow your knees to move naturally as you lower.
Choose a load that permits controlled repetitions without collapsing forward. If needed, squat to a sturdy chair or bench as a consistent depth target.
Rest approximately 90–120 seconds between sets. Use longer rests if breathing prevents you from maintaining technique.
Dumbbell Floor Press: 8–12 Repetitions
Lie on the floor with knees bent and feet planted. Press the dumbbells upward, then lower until your upper arms gently reach the floor.
Keep your wrists aligned and avoid flaring your elbows excessively. The floor gives each repetition a consistent stopping point.
If you lack dumbbells, use an incline push-up against a stable elevated surface. Select a height that allows the same repetition range with control.
Supported One-Arm Row: 10–12 Repetitions Per Side
Support one hand on a sturdy bench or suitable surface. Row the dumbbell toward your hip without rotating your torso.
Lower the weight smoothly and keep your neck comfortable. Begin with the less capable side, then match its repetitions on the other side.
Rest after completing both arms. The goal is controlled pulling strength rather than moving the heaviest possible dumbbell.
Glute Bridge: 10–15 Repetitions: Rucking Strength Workout Program
Lie on your back with knees bent. Press through your feet and lift your hips until your trunk and thighs form a comfortable line.
Pause briefly at the top without overextending your lower back. Begin with body weight and add resistance only when the movement feels consistent.
Dead Bug: 6–8 Repetitions Per Side
Lie on your back with arms raised and knees bent. Slowly extend one arm and the opposite leg while keeping your trunk steady.
Use a smaller range if your back arches. Each repetition should feel deliberate, with normal breathing throughout.
Strength Workout B: Hinge, Step, Press, and Carry
Workout B trains a hip hinge, single-leg movement, upper-body pressing and pulling, and loaded carrying.
Use two working sets initially. Keep the exercises technically controlled and stop sets before fatigue changes your movement.
Dumbbell Romanian Deadlift: 8–10 Repetitions: Rucking Strength Workout Program
Hold dumbbells in front of your thighs. Soften your knees and move your hips backward, keeping the weights close to your legs.
Lower only as far as you can maintain a comfortable back position. Stand by driving through your feet and extending your hips.
You do not need to reach the floor. The appropriate range depends on your control and individual movement capacity.
Low Step-Up: 8–10 Repetitions Per Leg
Use a low, stable platform. Place one foot fully on the surface and step upward with control.
Lower slowly and avoid pushing aggressively from the trailing foot. Begin without weights, particularly if balance is unfamiliar.
If you lack a suitable platform, use a supported split squat. Hold a stable support and work within a comfortable range.
Dumbbell Overhead Press: 8–10 Repetitions: Rucking Strength Workout Program
Press the dumbbells overhead without leaning backward. Keep the movement smooth and use a comfortable grip.
If overhead pressing is uncomfortable, substitute the floor press or an incline push-up. Maintaining a tolerable pressing pattern matters more than forcing this particular exercise.
Supported Dumbbell Row: 10–12 Repetitions
Use the same row variation as Workout A. Repeating a movement makes it easier to track progress and refine technique.
Keep the weight manageable enough to avoid shrugging or twisting. Consistent repetitions provide a clearer measure of strength than momentum-assisted lifts.
Suitcase Carry: 20–30 Seconds Per Side: Rucking Strength Workout Program
Hold one dumbbell at your side and walk slowly through a clear area. Stay tall without leaning away from the weight.
Switch sides after resting briefly. If space is limited, stand still while maintaining the same position.
Keep these carries modest because your weekly rucks already provide additional loaded activity.
Week 1: Establish a Comfortable Starting Point
Complete both strength workouts with two sets per exercise and conservative weights. Your main task is learning the movements and recording a usable baseline.
Perform one primary ruck lasting 15–20 minutes on flat ground. Use a light pack and an easy conversational pace.
Keep Friday unweighted. Check your feet and note how you feel later that day and the following morning.
What to Record
Write down total pack weight, loaded walking minutes, route, and perceived effort. For lifting, record exercise weights and completed repetitions.
Also note discomfort and unusual fatigue. These observations determine whether you are ready to progress.
Week 2: Add a Small Amount of Walking Time
If week one felt comfortable and recovery was normal, extend the primary ruck by approximately five minutes. Keep the pack, pace, and route similar.
Continue with two strength sets per exercise. Add a repetition to selected sets if you can still finish with two or three repetitions in reserve.
If the first week caused lingering symptoms, repeat its workload or reduce it. Progression is an option earned through recovery.
Week 3: Build Training Capacity: Rucking Strength Workout Program
Increase the primary ruck by another approximately five minutes if appropriate. For someone who began at 20 minutes, this brings the session to around 30 minutes.
Keep pack weight unchanged. Introduce the optional Friday ruck only if the single weekly session has been consistently comfortable.
Increase Selected Strength Sets
Add a third set to the squat, press, and row in Workout A. In Workout B, add a third set to the Romanian deadlift and row.
Keep bridges, trunk exercises, step-ups, and carries at two sets. This targeted increase avoids expanding every part of the program simultaneously.
Week 4: Consolidate Your Progress
Repeat week three’s rucking duration and pack weight. This week provides time to become comfortable with the workload already established.
Maintain strength sets, adding repetitions only where technique and recovery support them. Avoid chasing heavier dumbbells simply because the calendar has advanced.
If fatigue has accumulated, omit the optional ruck and return selected strength exercises to two sets.
Assess Whether the Program Fits
Consider whether you are recovering before the next session, maintaining normal daily energy, and enjoying the routine.
A program that repeatedly disrupts sleep, walking comfort, or strength performance needs adjustment. Holding steady is often more useful than adding work.
Week 5: Extend the Primary Ruck
If week four went well, add approximately five minutes to the primary ruck. Someone following the upper starting duration would now walk for about 35 minutes.
Keep Friday short and optional. Preserve the same easy pace rather than increasing speed alongside duration.
For strength exercises, use a simple double-progression approach: build repetitions within the prescribed range, then increase resistance slightly.
How to Increase Dumbbell Weight: Rucking Strength Workout Program
Once you reach the top of the repetition range on every set with consistent technique, try the next manageable weight.
Return toward the lower end of the range after increasing resistance. If the weight jump is too large, remain with the current dumbbells and improve control instead.
Week 6: Finish With a Repeatable Benchmark
For the final primary ruck, either repeat week five or add another approximately five minutes. A typical finish is around 30–40 minutes, depending on your starting point and recovery.
Use your original pack weight so the comparison is meaningful. The final session should remain controlled rather than become an all-out test.
Continue your strength workouts at the established volume. Avoid testing maximal lifts during the same week.
Evaluate Your Results
Look for easier breathing at a familiar pace, greater walking comfort, more controlled repetitions, or increased resistance on strength exercises.
Also assess consistency. Completing a manageable routine for six weeks creates a foundation you can build on.
You do not need a heavier backpack to demonstrate success.
Recovery, Nutrition, and Common Mistakes
Recovery supports the next workout. Keep easy days easy, maintain a consistent sleep routine, and eat regular meals that provide enough energy for training.
Include protein-containing foods across your meals and carbohydrate sources that suit your activity and preferences. Longer walks, heat, and increased overall exercise can also change your fluid needs.
Avoid Turning Every Session Into a Challenge
A common mistake is increasing pack weight, distance, and pace together. Another is adding rucking to an already demanding leg-training schedule without reducing anything else.
Judge the program as a whole. If you already perform additional sports or strenuous physical work, omit the optional ruck and consider fewer strength sets.
Respond Early to Pain and Pack Problems
Stop loaded walking if you develop sharp pain, numbness, dizziness, or a limp. Persistent symptoms warrant assessment rather than repeated attempts to push through.
Address hot spots promptly, and adjust straps that cause pressure. HPRC notes that poorly distributed shoulder loading can contribute to nerve compression symptoms such as tingling and numbness.
Ordinary muscular effort should remain distinguishable from symptoms that alter how you move.
Frequently Asked Questions About Rucking and Strength Training
Can This Program Help With Weight Loss?
The program adds regular physical activity and resistance training, which can support a weight-management routine. Actual weight changes depend on food intake, overall activity, and consistency.
Avoid expecting a specific calorie burn or guaranteed six-week result. Track fitness improvements alongside any body-composition goals.
Can You Ruck and Lift on the Same Day?
You can combine them when necessary, but keep the ruck short and easy. If strength is the priority, lift first and assess whether you still feel comfortable walking afterward.
Avoid combining your longest ruck with your most demanding lower-body workout. Separate days make recovery easier to monitor.
Should Beginners Run With a Rucksack?
This program uses walking throughout. You can create sufficient progression through manageable duration increases without introducing loaded running.
If walking becomes easier, complete the six-week block before deciding what additional challenge serves your goals.
What Should You Do After Six Weeks?
Repeat the program with slightly stronger lifts or continue the established schedule for several weeks. Keep the longest ruck comfortable before changing another variable.
If you eventually add pack weight, shorten the first session at that load and reassess recovery. Small, deliberate changes make the next training block easier to manage.
Build Strength and Endurance With Consistent Training
A successful 6-week rucking and strength program begins with work you can recover from and repeat. Two full-body workouts develop strength, while gradual loaded walks build familiarity with carrying a backpack.
Start light, keep your walking pace comfortable, and allow performance to guide progression. By the end of six weeks, the most useful result is a stronger, more confident training routine that fits your life and gives you a clear path forward.
To complement your 6-week rucking and strength program, explore our Beginner Rucking Workout Plan for backpack setup and gradual progression, and our Full-Body Dumbbell Workout Plan For Beginners for foundational lifting exercises. Find additional leg-training ideas in our 30-Minute Lower-Body Strength Workout, explore trunk exercises in our Functional Core Workout For Strength And Stability, and discover an alternative loaded-walking format with our 30 Minute Weighted Walking Dumbbell Workout. Use these guides to select suitable exercises within your existing schedule while keeping progression and recovery manageable.


Most Recommended

Subscribe to our Newsletter
Stay up to date on the latest men’s health, fitness and lifestyle trends and tips.
About Us
Men’s Fit Club was started with the goal of empowering men to get the most out of their lives. This meant going beyond exercise and diet tips to really address the broad range of issues that men face on a daily basis – topics like recreation, finding love, sexual health and even sound fashion advice.
Quick Links
© COPYRIGHT MEN'S FIT CLUB 2026. All Rights Reserved